In the last post, I shared some of how I organize my ‘Creative Space’. Nothing has changed unless you count making a mess. I have a new project. A small ornament swap, I’ll share more about that later.
New Command Center
The table stays pretty clear because I use it for just about everything… cutting, planning, computing, and shipping. However, the table is going to change and I have a new layout I want to try as well. This means I need to find a block of time to clean up everything that is currently out or in use.

A few months ago I found some motorized lift desks. The current tabletop on this desk is about 5 feet long and 3 feet wide, and irregular. My plan is to attach a larger melamine on top of the current tabletop. I like a big table, in the neighborhood of 4 feet wide by 6-8 feet long. In addition to bigger, I will be able to raise and lower the table for whatever I need to do. I really like a higher table for cutting, and since I am short a lower table for sitting at. The problem with a regular height table or desk is either a chair won’t get me high enough for comfort or if it does, my feet don’t rest on the floor. There are still so many projects to do in the basement area… so the picture also includes other things waiting to move.
UFO Report
In the meantime, I have a completed project… a UFO.
When I first set up the ‘Creative Space’, I knew I wanted to make some creativity happen. But with what? Did I want to piece, applique, stitch, quilt? Make something new or finish something that had already been started, (aka UFO)? Making a new something seemed like such a big mess to make so I decided to see what was in the UFO box. While I going through them I reorganized them. Bonus!

After sorting the UFOs, I chose a little piece that started as a sample and designed to remain unfinished for a little while. I love bright happy flowers, and these certainly fit the bill. This was the beginning of the project, and as you can see as we move along, this was the initial concept.

And the concept changed. I added stems and a vase before starting the threadwork. I completed the threadplay, or so I thought. Also, originally, there was a quilting plan, marked in blue water-soluble marker, but I didn’t like it. I spritzed the blue marks off with water and a color ran. I thought it was from a flower fabric, and essentially a ruined project to that is where I left it with disappointment. However, I determined it might be a good teaching tool; the colorfastness of thread and fabric isn’t always guaranteed. It is difficult to see, but at the top of the large pink flower, you can see a bit of a color bleed, between the 2 yellow zinnias.

For the quilting, I decided on some regular wavy lines, (that mimick the vase shape), and quilted those. I then quilted the “table” in a free motion wood grain. Bound it and gave it a bath. To my surprise, the color bleed was from the thread. The thread dye rinsed right out even though I had pressed it several times during construction!
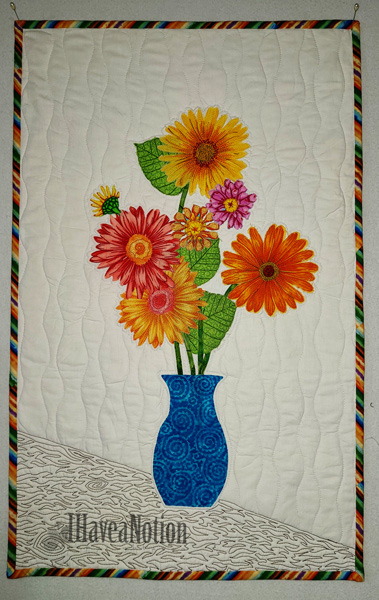
All done. I still like the flowers, but it is not my most favorite composition… or completion. One of the things I learned is that before you begin work on a boxed UFO project, is to take a few minutes or a day to reacquaint yourself with the project and where you left off; and assess everything that still needs to be done. I had missed some threadwork and discovered it while quilting, (flower centers), so I did that while quilting. It made the back very inconsistent.
Cute Cats
I promised cute cats, (this one is especially for Linda). Linda has virtually adopted the cats and sends them treats. She has kept them stocked with ‘Temptations’ since we moved out here and discovered that 7 cats came with the place. The cats are fed in the mornings, but I give them a few ‘auntie treats’ after I come back from feeding the cow in the evenings.

That is not all of the completed projects … I’ll share another next time!!! and if you are still here. Thanks for reading.
Please stay well, wash your hands, wear a mask, and stay home as much as possible.
More Later- Beth